Thursday, April 20, 2017

A Little Esox Dishcloth

As Earth Day approaches and while I'm still on a mission to replace all of my dishcloths and washcloths with handmade ones, I've come up with a couple of new patterns. Today's pattern has a little bit of texture and a little bit of color pooling too.

For this dishcloth, all you need is a 4.0 mm/G hook and about 2.5 oz of cotton yarn. (The yarn I used is a pretty, variegated yarn I picked in the mill ends bin at Joann's.)

esox dishcloth in progress

Abbreviations Used:
Ch: chain
Hdc: half double crochet
Sc: single crochet
Ss: slip stitch
St: stitch/stitches

Instructions:

Row 1: Ch 36, sc in 2nd chain from hook and each across. Ch 1, turn. (35 st)
Row 2: Hdc in first st, ss is next. *Hdc in next, ss in next* repeat from * to * across until one st remains. Hdc in last st, ch 1 and turn. (35 st)

Repeat row 2 until piece measures 9" in length. 

Sc evenly around with 3 sc in each corner st. Fasten off and weave in ends.

A little esox dishcloth

Final measurement is approx. 9" x 9"

Wednesday, April 19, 2017

Lazy Days Dishcloth

     I've decided to replace all of my worn out dishcloths and washcloths with handmade ones. I find that knit and crochet cloths are more durable, clean up messes very well and last FOREVER. I love how soft and cushy they feel too. So when cotton yarn is on sale, I buy a few cakes or skeins and try to come up with a new pattern. Today's dishcloth uses a very versatile stitch pattern and it's a super easy two row repeat.

     For this dishcloth, I used a 4.0 mm (G) hook and 2 oz of Sugar' n Cream cotton yarn in the colorway Batik.

Lazy Days Dishcloth

Notes:

  • Make the chain 1 at the beginning of the even rows a little longer to accommodate the first dc.
  • Final dimensions are 9" x 9"

Instructions:

Row 1: Ch 36. Sc in 2nd chain from hook, dc in next. *sc in next, dc in next* repeat from * to * until one chain remains. Sc in last chain. Ch 1 and turn. (35 stitches)
Row 2: Dc in first stitch, sc in next.*Dc in next, sc in next* repeat from * to * until one stitch remains. Dc in last stitch, Ch 1 and turn. (35 stitches)

Repeat rows 1 and 2 until piece measures roughly 9 inches.

For the border, you can sc evenly all the way around or just leave it without. I don't mind the way it looks without the border.

Monday, February 13, 2017

Letting the weather guide me

     Late last year, I decided to make one of those awesome temperature afghans I had been seeing in many of the crochet groups I am in. So then I sat down to figure out all the details. What kind of yarn would I use? What colors? What stitch? Hook? Would it be highs or lows? Both? I didn't realize just how many choices I had when it came to this one project.

     After looking at a LOT of different yarns, I settled on Red Heart Super Saver because it is cost effective and I liked the range of colors available to me. Now before I could really choose the specific colors I wanted, I needed to figure out my temperature ranges.I decided to go with the High temps for the day. So my yarn/temperature chart looks something like this.

temperature blanket gauge

     I then  took a bit of time, giving it a bit of thought and trying to gauge what kinds of temperatures I'd be dealing with, I decided on ten degree increments. Once I knew how many colors I would need, then I went about picking my colors. I ended up with ten different colors. 

     Now that I was set on my colors, I did more searching on Pinterest to see what stitches and patterns others had used in the past. I wanted something that I could do 365 rows of and not have my blanket be gigantic. I settled on Moss Stitch, a simple single crochet, chain one repeat. I must say though that this was not my first choice. I did start out with another stitch (hdc, ch 1) and crocheted six or seven rows. However, I paused a moment, did a little math and had to rip all of those rows out once I realized my blanket would end up about twelve feet long if I used that stitch. 

     The only things left to do were pick out my hook size and figure out how wide to make it. The hook size was a piece of cake. My favorite hook size is a J hook. As for size, I just started chaining until it looked about right. My starting chain was around 200 chains. I don't quite remember and I really should have written that down. Oh and every time I go to count it, my four year old starts counting. So.... there goes that haha.

     Right now I am a little behind in my rows but I do keep track of the highs for the days in my planner and I refer to Weather Underground to help me with that.

temperature afghan


This is through the month of January. I'm currently rather aggravated with the fact that we had sixty degree days in January. I did not exactly envision yellow yet. I'm just irked by it lol.

Friday, February 3, 2017

My Black Heart... Pillow

With Valentine's Day coming up and seeing hearts all over Pinterest, I figured I would make something fun. So, I looked through my yarn stash and saw this super bulky Lionbrand yarn, grabbed a pair of big needles and sat down to create. What I came up with is a heart pillow, black on one side, white on the other. I put it to the side for a few days because I knew I wasn't done with it but wasn't quite sure what to do to make it feel complete.

black heart pillow with love written on it


Now, I'll be the first to say that free hand needlepoint/embroidery is not my strong suit but I thought I'd give it a go. After a few tries (well maybe a few more than a few), I managed to stitch "love" onto the black side. On the flip side is "you" because it only made perfect sense to do that.

white heart pillow with you written on it


This heart pillow works up quite quickly and you can really have fun with it. You can stitch words on it or attach appliques onto it. You can even leave it as is!

For this pattern, you will need:

2 (5 oz/81 yds) Skeins of LionBrand Hometown USA
Size 13/9 mm Straight Needles
Polyfil (or similar stuffing material)
Yarn Needle
Scissors
(Optional, worsted weight yarn for embroidery)

Abbreviations Used:
BO : Bind Off
CO : Cast On
K : Knit
KFB : Knit into the front and back
K2TOG : Knit 2 together
P : Purl
P2TOG : Purl 2 together
SSK : Slip slip knit
SSP : Slip slip purl
ST(S) : Stitch(es)

Stitch Notes:
SSP- Slip two stitches as if to knit. Slide those stitches back onto left needle. Insert right needle into stitches from the back and then purl both at once.

CO 11 sts.
Row 1: K all sts
Row 2: Kfb, P9, Kfb (13)
Row 3: K all sts
Row 4: Kfb, P11, Kfb (15)
Row 5: K all sts
Row 6: Kfb, P13, Kfb (17)
Row 7: K all sts
Row 8: Kfb, P15, Kfb (19)
Row 9: K all sts
Row 10: Kfb, P17, Kfb. Cut yarn and push work to back of needle. (21)

On same needle, CO 11 sts. Repeat rows 1-10. Do not cut yarn.
Row 11: K all sts (42)
Row 12: Kfb, P40, Kfb (44)
Row 13: K all sts
Row 14: Kfb, P42, Kfb (46)
Rows 15&17: K all sts
Rows 16&18: K1, P44, K1
Row 19: K1, Ssk, K40, K2Tog, K1 (44)
Row 20, K1, P42, K1
Row 21: K1, Ssk, K38, K2tog, K1 (42)
Row 22: K1, P40, K1
Row 23: K1, Ssk, K36, K2tog, K1 (40)
Row 24: K1, P38, K1
Row 25: K1, Ssk, K34, K2tog, K1 (38)
Row 26: K1, P36, K1
Row 27: K1, Ssk, K32, K2tog, K1 (36)
Row 28: K1, P34, K1
Row 29: K1, Ssk, K30, K2tog, K1 (34)
Row 30: K1, P2tog, P28, Ssp, K1 (32)
Row 31: K1, Ssk, K26, K2tog, K1 (30)
Row 32: K1, P2tog, P24, Ssp, K1 (28)
Row 33: K1, Ssk, K22, K2tog, K1 (26)
Row 34: K1, P2tog, P20, Ssp, K1 (24)
Row 35: K1, Ssk, K18, K2tog, K1 (22)
Row 36: K1, P2tog, P16, Ssp, K1 (20)
Row 37: K1, SSk, K14, K2tog, K1 (18)
Row 38: K1, P2tog, P12, Ssp, K1 (16)
Row 39: K1, Ssk, K10, K2tog, K1 (14)
Row 40: K1, P2tog, P8, Ssp, K1 (12)
Row 41: K1, Ssk, K6, K2tog, K1 (10)
Row 42: K1, P2tog, P4, Ssp, K1 (8)
Row 43: K1, Ssk, K2, K2tog, K1 (6)
Row 44: K1, P2tog, Ssp, K1 (4)
Row 45: Ssk, K2tog (2)

BO and weave in ends.

Repeat this one more time for that second heart.  Now, you just have to decide how much or how little you want to decorate your pillow. I found it easier to embroider the pillow before sewing it together and stuffing it.


Sunday, January 29, 2017

Little V's Dishcloth


photo collage of little v dishcloths


I love handmade dishcloths. I love how creative you can be with the stitch patterns. I also love trying out stitch patterns I have never tried before. I whipped up this dishcloth one evening after several attempts (and loads of frogging) to figure out what I wanted to make with some variegated cotton yarn. Then I saw this stitch pattern in one of my books. It's a fairly simple pattern and I definitely plan on using it in other future patterns.
Little V dishcloth

Finished Size: 9 in x 9.5 in
Gauge is 16 st and 18 rows is 4 inch square
(gauge is not really necessary for this pattern)
Materials:
WW cotton yarn (I used I Love This Cotton)
Size 6 straight needles
yarn needle
scissors

Abbreviations Used:
BO - bind off
CO - cast on
K - knit
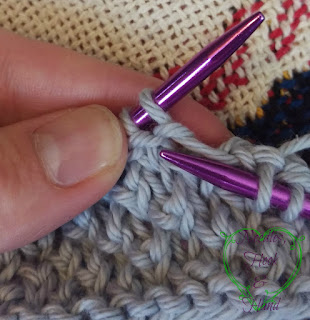
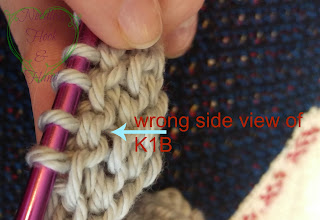
K1b - knit stitch one row below (see photos below)
P - purl
SL1P - slip one stitch purlwise
ST - stitch/stitches

CO 41 st in your preferred CO method.
Row 1: SL1P, k38, p1
Row 2-3: Repeat row 1
Row 4: SL1P, k2, *K1b, k*, repeat from * to * across to last 4 st, K1b, k2, p1.
Row 5: SL1P, k38, p1
Row 6: SL1P, k2, *k, k1b*, repeat from * to * across to last 4 st, k3, p1.
Row 7: SL1P, k38, p1

Repeat rows 4-7 until work measures approximately 8.5 inches in length.
SL1P, k38, p1.
Repeat this last row two more times. BO and weave in ends.

Notes to remember:
*Odd numbered rows are the right side.
*The first stitch of each row will always be slipped as if to purl.
*The last stitch of each row will always be purled.
*To make this dishcloth bigger or smaller, simply adjust your number of cast on stitches to a multiple of 2 + 1.

close up of knit one row below
Knit Stitch One Row Below (K1B)

wrong side view of knit one below
Wrong Side View of K1B

close up of little v dishcloth


Sunday, January 22, 2017

Easy Peasy Kitchen Scrubby

I've been ridiculously absent from my blog for a long time. Far too long but having a two littles under the age of three makes down time extremely hard to come by in this house. However, one of my New Year's resolutions is to be a better blogger and this post will be the first of many for 2017.

Over the holidays, I was playing around with some scrubby-ish yarn I picked up in the "Mill End" bin at Joann's a while back. It didn't take long to knit up the easiest kitchen scrubby ever and all you need is a little bit of yarn.

(This scrubby is made with Sugar & Cream.)

For this pattern, I used some cotton yarn paired with the scrubby yarn and size 7 straight needles. I used Lily's Sugar & Cream and I Love This Cotton along with the Premier Washi yarn.

Finished Size: 4.5 in x 5.5 in
Gauge for this pattern really isn't important.

Materials:
WW Cotton Yarn
"Scrubby Yarn"
Size 7 straight needles
yarn needle
scissors

Note: This scrubby is knitted using both the cotton and the scrubby yarn at the same time.

Abbreviations Used:
BO - bind off
CO - cast on
K - knit
P - purl
SL1P - slip one stitch purlwise
ST(S) - stitch/stitches

CO 20 sts (any CO method will work).
Row 1: SL1P, k18, p1.
Repeat row 1 until piece measures approximately 4.5 inches from CO edge.
Bind off and weave in ends.

(This scrubby is knit with I Love This Cotton.)

That's it!